
How to run Jupyter notebooks on AWS with a reverse proxy
16 Nov 2017I needed to host a Python Jupyter Notebook remotely and then use this at work to do some data analysis with python. The problem was that the company firewall filtering was blocking ports stopping me accesssing the “bare” ubuntu instance running Jupyter.
To get around this, i setup an Nginx reverse proxy in front of the Jupyter server. This allowed regular HTTP access requests from outside clients on port 80, to be directed to the jupyter server. Maybe this setup will be useful to others who want a hosted Jupyter server.
The setup
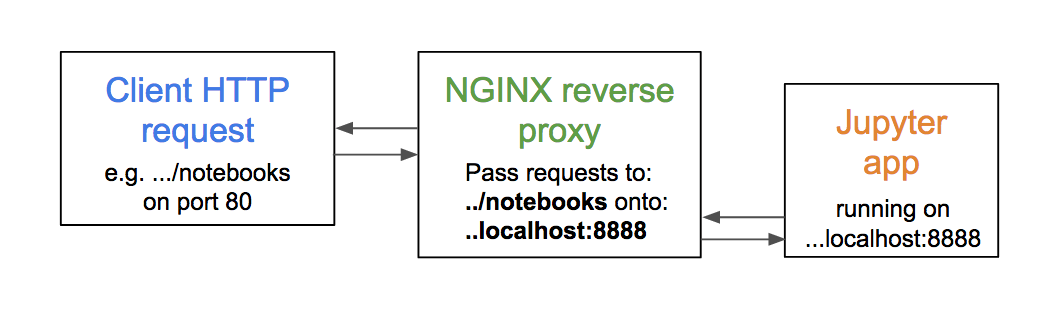
The diagram below shows the setup. Basically, an Nginx reverse proxy server will proxy requests from the client back to our jupyter web app running on an AWS EC2.
1. Launch an Ubuntu EC2 instance
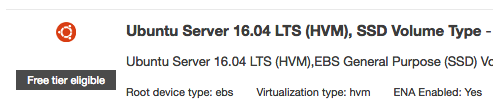
First up, sign into the AWS console, head over to the EC2 section and hit launch instance. Select the Ubuntu Server 16.04 LTS (HVM) SSD AMI.
Follow through the steps to launch the instance. I just chose the t2.micro tier with 1 CPU for running fairly light python tasks and it costs around $10 per month. (If you’re a student its worth checking out if you can claim free AWS credits :).
2. Configure the Instance
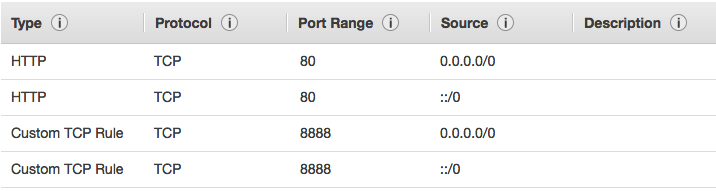
Setup the inbound security rules as follows. You can leave the outbound rules as the default.
Next, open up a terminal and SSH into the instance. We will now install Python and Jupyter using the Anaconda distribution.
To do this, go here, right click on the green download link and copy the URL.

Then, run the following commands to download and install python on your instance using anaconda:
$ wget http://repo.continuum.io/archive/Anaconda3-4.1.1-Linux-x86_64.sh # or your pasted URL copied above
$ bash Anaconda3-4.1.1-Linux-x86_64.sh
Answer yes when it asks to update your PATH environment variable. Anaconda will also install Jupyter and some other useful libraries such as numpy.
To check the installation was performed, run the following:
$ which python3
and you should get something like /home/ubuntu/anaconda3/bin/python3
3. Configure Jupyter
Next, we need to setup a password for the accessing notebook. This will be useful to restrict access to the notebook when we have the reverse proxy setup.
To do this, first enter the ipython enviroment using:
$ ipython
Once in the enviroment, enter the following:
from  IPython.lib import passwd
passwd()
This will ask you to enter a password. Enter anything you like, and once verified, the hash of your chosen password is given. Copy this hash and paste it somewhere for later.
Next, we need setup the jupyter configuration file. The following command will generate a default configuration file which we can then update:
$ jupyter notebook --generate-config
By default, this will generate the configuration file jupyter_notebook_config.py which is located under the .jupyter folder in the home directory. Using nano or vim, open and edit this config file as follows.
c.NotebookApp.base_url = '/notebook/'
c.NotebookApp.port = 8888
c.NotebookApp.trust_xheaders = True
c.NotebookApp.port_retries = 50
c.NotebookApp.password = paste your hashed value from earlier
The NotebookApp.base_url and NotebookApp.port will need to match with the proxy setup in the next section. In this case, we will configure nginx to proxy incoming requests to port 8888 where the jupyter notebook app will be running.
4. Setup Nginx
Nginx is a popular HTTP and reverse proxy server. We will setup Nginx to act as a web server, listening for HTTP requests on port 80. If these requests are made to the correct URL, Nginx will direct these requests to port 8888 where the jupyter notebook will be running.
First, install Nginx:
$ sudo apt-get update
$ sudo apt-get install nginx
Once this has been installed, navigate to the Nginx configuration file located at /etc/nginx/site-enabled/default. Update the server block to the following:
server {
location /notebook {
    proxy_pass http://localhost:8888;
    proxy_set_header X-Forwarded-For $proxy_add_x_forwarded_for;
    proxy_set_header X-Real-IP $remote_addr;
    proxy_set_header Host $http_host;
    proxy_http_version 1.1;
    proxy_redirect off;
    proxy_buffering off;
    proxy_set_header Upgrade $http_upgrade;
    proxy_set_header Connection "upgrade";
    proxy_read_timeout 86400;
} ...
With this setup, when a request to /notebook is made, Nginx will proxy this to localhost:8888, where the jupyter notebook is running.
Once you have made these updates, you can restart Nginx using the following:
$ sudo service nginx restart
Now, go to your AWS console, select your running instance, and copy the Public DNS as listed in the bottom right hand corner of the Description tab. Paste this address in a new tab, and append this with /notebook. Enter the password which you set earlier, and you should then gain access to your Jupyter notebook server!
5. Automatic restart of the server
While working on your notebooks you can save your work using the top left hand menu. When you shutdown and subsequently restart your instance, these changes will be preseved.
However when you shutdown and restart the instance Jupyter will not automatically restart. So, to save you having to SSH into your instance and start this manually each time, we can use cron to have the server and Jupyter start on every @reboot event.
To do this, run the following command to create a crontab for your ubuntu instance:
$ crontab -e
When asked, select nano as your editor. In the crontab, using Nano, edit the file to add the following:
@reboot nohup jupyter notebook
@reboot cd /home/ubuntu; source ~/.bashrc;  /home/ubuntu/anaconda3/bin/jupyter
The part of the last line /home/ubuntu/anaconda3/bin/jupyter should be the output of which python3 from step 2. This is required so that cron sources the correct path for the python installation.
Now, if you shutdown and restart your instance, your Jupyter notebook server should have automatically restarted and be ready for you when you hit the \notebook URL.
Hope thats helpful!